2.2. Prepare to Install

Before we actually install our Scientific Computing Environment and start learning to use it, it’s very helpful to get an overview of what we are going to do.
Here are the steps. You are going to do the first 2 steps now .
2.2.1. Find out what kind of hardware you have
32 or 64 bit
You will need to know if your computer is a Mac or a PC ( DUH! ), and if it is a 32- or 64-bit machine. Most computers purchased since 2012 will be 64-bit, but you will want to check to be sure.
How much Memory?
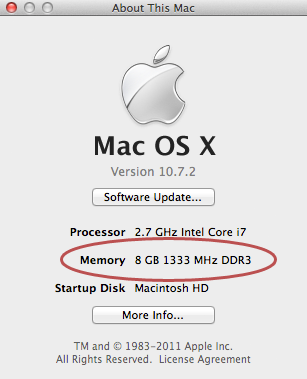
Next you will need to know how much memory (usually between 2 and 16 Gigabytes) your computer has. You can see both of these by doing the following.
On a PC, Click the Start globe at the lower left, on the menu that opens Right- Click Computer and select Properties. That is: Start->(Right Click) Computer->Properties. This opens an info window, where you can see your data width 32- or 64-bit, and the amount of installed memory.

On a Mac: Click the Apple logo at the upper left. On the menu that drops down, select About this Mac . From the info window, you can see how much memory you have. Unless you have a very old Mac, you have a 64-bit data bus.

Finally, you need to know how much free diskspace you have. You won’t need a whole lot, but you should have at least 10 Gb free. Linux will only use what it needs.
On a PC: Click Start->Computer. Look at your C: drive; You will see a bar graph
showing the total size and amount used. Below this, the amount of free
space is shown, 125 Gb free out of 297 Gb, in the case displayed
below.

On a Mac: Click Apple->About this Mac. Next select More
Info.... On the window that pops up, select Storage. Find your
Macintosh HD, and notice the amount of free disk space above the bar
graph.
Again, here is the list of the information you need. Write down what you find.
- Data bus width: 32- or 64-bit?
- Amount of Memory
- Disk size and free space
2.2.2. Downloading the Appropriate Software Items
You will need to download the VirtualBox Installer appropriate for your computer
Visit Oracle: Download VirtualBox , select the appropriate one, and save it to your computer.
- If you have a PC, Download: VirtualBox for Windows Hosts (click the x86/amd64 link)
- If you have a Mac, Download: VirtualBox for OS X Hosts (click the x86/amd64 link)
- Next download The Fedora Linux - Scientific ISO file This is a large file (about 3.5 Gb), and thus it will take some time to download.
Note
If you know you have an old 32-bit PC, or are comfortable with Torrent Downloads use one of the other links
But for most people, you will want to get the 64-bit PC Direct Download file from: https://labs.fedoraproject.org/scientific/download/index.html
If you have trouble, let me know. I want you to get the latest version, but I can put a copy on the Physics Department server which may download faster for you.
Again, see me if you have trouble getting one of these. I can burn you a copy.
That’s it! All the scientific software you need is Built-in to Fedora Scientific Linux.
Do these steps now!
Before your go to the next section: Install..., you need to have done the steps above:
- Check and record your computer hardware info
- Download VirtualBox ,
- Download https://labs.fedoraproject.org/scientific/download/index.html
2.2.3. Next Steps
After these first 2 steps, you will carry out the following steps. Read through these so that you understand what is ahead.
Install VirtualBox
Create and configure a virtual machine (VM)
on which you will install Linux.
Start the VM with the Fedora ISO in its virtual DVD drive.
Go through the Linux Installation proceedure on the VM.
You will do some minor configuration steps, such as selecting your language preference, then you will choose a root password and make a standard user account for yourself.
Eject the Fedora Installation ISO file,
and reboot the VM**. This will start your fresh new Linux VM. You can login to your user account and look around.
Add “Guest Addition” features to your Linux VM.
By adding the included ” Guest Additions ” to your Linux VM, you can have features such as Seamless Mode (your Linux windows appear on your Windows or Mac desktop just like other programs) and more. Other features include:
- Shared Folders and Clipboard, between host and guest machines
- “Seamless” Desktop integration with the Host OS
Reboot with Guest Additions activated
Configure the Unix behavior and Desktop “Look-and-Feel” to your liking.
Start using your Scientific Computing system!
